React Native and Redux
Jan 3, 2016I’ve been excited about React ever since it came out but haven’t been able to blog about it. So naturally when ReactNative was introduced last year I was super anxious to try it and even more when the Android support was released.
For a quick intro, ReactNative lets you write apps for both iOS and Android using the same set of knowledge you only need to learn once. So its a “learn once, write anywhere” approach. This is different from say PhoneGap where its “write once, deploy anywhere”. Wait a minute, isn’t that more productive if you only need to write once and deploy anywhere? Sure if you have a very basic app, with PhoneGap you’re actually running html+css+js in a WebView, technologies which werent intended to build mobile apps so its an elaborate hack to build apps. With ReactNative you write your components in jsx which gets translated into native components so you get the ease of writing components from familiar technologies coming from React with the performance of a native app.
Ok so what about Redux? React encourages having each component manage its state and data flow using Flux architecture, which basically just means that your flow of data should only go through one direction so it becomes predictable and in turn easier to debug among other benefits that i can remember. Redux still encourages single data flow but instead of having each component in your component hierarchy manage its own state, its gets passed down to it coming from its parent. And Redux isn’t just for ReactNative, you can use it with React as well for webapps.
Think of it as having a root state which is just a json object with fields in it, each field gets passed to components which only need those data and whenever you want to update some data, you send out an action which gets processed by reducer and changes gets applied on that root state which in turn propagates the changes down to components. So you see it goes around in circle and that’s how it achieves the single directional data flow.
In this post we’ll be writing the basic search functionality of an external Youtube playlist I started called ExtPlaylist. The idea is pretty simple, you just write playlist without having to signup for Youtube account. We do this by storing the playlist data externally using, wait for it… BoltApi :). Although in this post we focus just on search, you can lookup the master branch for ExtPlaylist which already has playing of video and adding them to playlists. Also ExtPlaylist has a search-only branch where you can see a working example of what we’ll be writing.
We’ll be focusing just on iOS so make sure you have ReactNative installed. First lets create the project:
react-native init ExtPlaylist
This will walk you through creating a new React Native project in /Users/marconi/Desktop/ExtPlaylist
Installing react-native package from npm...
This will create the project and install npm dependencies, lets add some more dependencies of our own:
cd ExtPlaylist
npm i react-native@0.17.0 redux@3.0.5 react-redux@3.1.2 redux-logger@2.3.1 redux-thunk@1.0.2
...
One think to note here, we’re using react-redux@3.1.2 when there’s a more recent version now because the recent version doesn’t work yet with ReactNative with bundled React in it. There’s an ongoing issue about it here but its almost there.
Since you could be running in a more recent ReactNative project when you installed react-native-cli, we need to make sure our project’s structure matches the ReactNative version we just installed.
react-native upgrade
...
Next lets setup some directories:
mkdir -p apps/components apps/images
Copy over the youtube-logo.png file from ExtPlaylist repo to the images folder. Now lets create wrapper.js from the root of the project:
'use strict'

import React from 'react-native'
import { applyMiddleware, createStore } from 'redux'
import { Provider } from 'react-redux/native'
import createLogger from 'redux-logger'
import thunk from 'redux-thunk';
import rootReducer from './apps/reducers'
import App from './apps/app'

const logger = createLogger()
const createStoreWithMiddleware = applyMiddleware(thunk, logger)(createStore)
const store = createStoreWithMiddleware(rootReducer)

const wrapper = () => {
  return (
    <Provider store={store}>
      {() => <App />}
    </Provider>
  )
}

export default wrapper
On line 12, we’re applying the thunk and logger middlewares. The thunk lets you create async actions for making ajax requests and logger logs the state transition to chrome’s console so you can see the transition from state to state. Then on line 13 we’re creating a store by calling createStoreWithMiddleware against our root reducer. A ReduxStore doesn’t actually know how to mutate your data that’s why it needs your reducers. A root reducer is just a collection of all your reducers which we’ll see later. On line 15-21 we have our wrapper function which returns the Provider component, this is how we get to offer Redux store down to our components.
Note that in recent versions of react-redux we need not wrap the App inside Provider which another function, this only happens since this version of react-redux we are using uses react@0.14.0-rc1. Now that we have our wrapper, lets update our index.ios.js which is the entry point for iOS app:
'use strict';

import React, {
  AppRegistry
} from 'react-native'
import wrapper from './wrapper'

AppRegistry.registerComponent('ExtPlaylist', () => wrapper)
Nothing fancy here, we’re just registering our wrapper as our main component to invoke when the app is run. Next is our apps/app.js file, its a bit bigger so we’ll go through it parts by parts:
'use strict'

import React, {
  View,
  Text,
  Navigator,
  StyleSheet,
  TouchableOpacity,
} from 'react-native'
import { bindActionCreators } from 'redux'
import { connect } from 'react-redux/native'
import {
  setSearchKeyword,
  runSearch,
  moreVideos,
  newSearch,
} from './actions'
import Search from './components/search'

class App extends React.Component {
  render() {
    return (
      <View style={styles.container}>
        <Search
          error={this.props.search.error}
          keyword={this.props.search.keyword}
          isSearching={this.props.search.isSearching}
          setSearchKeyword={this.props.setSearchKeyword}
          runSearch={this.props.runSearch} />
      </View>
    )
  }
}

const stateToProps = (state) => {
  return {
    search: state.search
  }
}

const dispatchToProps = (dispatch) => {
  return bindActionCreators({
    setSearchKeyword,
    runSearch,
    moreVideos,
    newSearch,
  }, dispatch)
}

const styles = StyleSheet.create({
  container: {
    flex: 1,
    justifyContent: 'center'
  },
  navBar: {
    backgroundColor: 'white',
  },
  navBarText: {
    fontSize: 16,
    marginVertical: 10,
  },
  navBarTitleText: {
    fontWeight: '500',
    marginVertical: 9,
  },
  navBarLeftButton: {
    paddingLeft: 10,
  },
  navBarRightButton: {
    paddingRight: 10,
  },
  scene: {
    flex: 1,
    paddingTop: 63,
  }
})

export default connect(stateToProps, dispatchToProps)(App)
Here we’re just creating the App component with the Search component wrap inside it. Notice how we’re just passing props that are interesting to the Search component and not the whole state. From the App component, we get that search prop from stateToProps declared on line 35. Line 41 creates dispatchToProps function which just wraps everyaction passed to bindActionCreators with dispatch. Line 50 we have some styles, notice that in ReactNative we can use Flexbox to style the layout of our components, how cool is that! Finally on line 78 we call connect which is what connects the props and actions to our App component.
We can’t run this just yet, we still need to define our actions, reducers and Search component. Lets start with actions, create the file apps/actions.js:
'use strict'

const youtubeApiKey = '<YOUR_YOUTUBE_API_HERE>'
const youtubeApiBaseUrl = 'https://www.googleapis.com/youtube/v3'

export const SET_SEARCH_KEYWORD = 'SET_SEARCH_KEYWORD'
export const SEARCH_STARTED = 'SEARCH_STARTED'
export const SEARCH_RESULT = 'SEARCH_RESULT'
export const SEARCH_FAILED = 'SEARCH_FAILED'
export const MORE_SEARCH_RESULT = 'MORE_SEARCH_RESULT'
export const NEW_SEARCH = 'NEW_SEARCH'

export const newSearch = () => ({type: NEW_SEARCH})
export const setSearchKeyword = (keyword) => ({type: SET_SEARCH_KEYWORD, keyword})
export const runSearch = (keyword) => (dispatch) => _searchVideos(dispatch, keyword)
export const moreVideos = (keyword, nextPageToken) => (dispatch) => _searchVideos(dispatch, keyword, nextPageToken)

const _searchVideos = (dispatch, keyword, nextPageToken = null) => {
  dispatch(_searchStarted(keyword))

  const encodedKeyword = keyword.replace(' ', '+')
  let url = `${youtubeApiBaseUrl}/search?part=snippet&q=${encodedKeyword}&type=video&maxResults=10&key=${youtubeApiKey}`
  if (nextPageToken) {
    url += `&pageToken=${nextPageToken}`
  }

  return fetch(url)
    .then((resp) => resp.json())
    .then((data) => {
      if (data.error) throw data.error.message || 'Unable to search'
      return data
    })
    .then((data) => {
      if (nextPageToken) {
        dispatch(_moreSearchResultReceived(data))
      } else {
        dispatch(_searchResultReceived(data))
      }
    })
    .catch((err) => {
      dispatch(_searchFailed(err))
    })
}
const _searchStarted = (keyword) => ({type: SEARCH_STARTED, keyword})
const _searchResultReceived = (data) => ({type: SEARCH_RESULT, data})
const _moreSearchResultReceived = (data) => ({type: MORE_SEARCH_RESULT, data})
const _searchFailed = (message) => ({type: SEARCH_FAILED, message})
First don’t forget to set your YOUR_YOUTUBE_API_HERE, you can get that from Google Developer Console.
I tend to make private functions prefixed with underscore aside from not being exported so it should be clear we only have four actions here:
newSearch- Displays back the search componentsetSearchKeyword- As the user types search keyword, updates the state with whatever is being typedrunSearch- Calls Youtube search APImoreVideos- Called when user pages through search result
The most interesting one is the _searchVideos function, this is the one that actually calls the Youtube API but its private so both paging and initial search can use it. First it dispatches _searchStarted action to indicate that we’re about to run search, once its set this is the perfect spot to turn on preloaders, etc. or anything you want to run once the search starts. Then on line 27, we’re using the new fetch API which isn’t available on all browsers yet but ReactNative has it. fetch is promised based which is much cleaner than callbacks, here notice how for every case we dispatch new actions accordingly and that’s what those extra private actions are for since they are just called internally.
I mentioned earlier that thunk middleware allows async actions but only if the action returns a function. With that in mind you can see that both our runSearch and moreVideos does exactly that, while newSearch and setSearchKeyword just returns straight object.
Next is apps/reducers.js:
'use strict'

import { combineReducers } from 'redux'
import {
  SET_SEARCH_KEYWORD,
  SEARCH_STARTED,
  SEARCH_RESULT,
  SEARCH_FAILED,
  MORE_SEARCH_RESULT,
  NEW_SEARCH,
} from './actions'

const initialSearchState = {
  // searching
  error: '',
  keyword: '',
  isViewingResult: false,
  isSearching: false,

  // search result
  result: {
    items: [],
    prevPageToken: null,
    nextPageToken: null,
    pageInfo: {
      resultsPerPage: 0,
      totalResults: 0
    }
  }
}

const search = (state = initialSearchState, action) => {
  switch (action.type) {
    case SET_SEARCH_KEYWORD:
      return Object.assign({}, state, {keyword: action.keyword})
    case SEARCH_STARTED:
      return Object.assign({}, state, {isSearching: true})
    case SEARCH_FAILED:
      return Object.assign({}, state, {
        error: action.message,
        isViewingResult: false,
        isSearching: false,
        result: {
          items: [],
          prevPageToken: null,
          nextPageToken: null,
          pageInfo: {
            resultsPerPage: 0,
            totalResults: 0
          }
        }
      })
    case SEARCH_RESULT:
      return Object.assign({}, state, {
        isViewingResult: true,
        isSearching: false,
        result: Object.assign({}, state.result, {
          items: action.data.items,
          prevPageToken: action.data.prevPageToken || null,
          nextPageToken: action.data.nextPageToken || null,
          pageInfo: action.data.pageInfo
        })
      })
    case MORE_SEARCH_RESULT:
      return Object.assign({}, state, {
        isViewingResult: true,
        isSearching: false,
        isViewingVideo: false,
        viewedVideo: null,
        result: Object.assign({}, state.result, {
          items: [
            ...state.result.items,
            ...action.data.items
          ],
          prevPageToken: action.data.prevPageToken || null,
          nextPageToken: action.data.nextPageToken || null,
          pageInfo: action.data.pageInfo
        })
      })
    case NEW_SEARCH:
      return initialSearchState
    default:
      return state
  }
}

const rootReducer = combineReducers({search})

export default rootReducer
Line 13 declares our initial search state, with this our root state now looks like this:
{
  search: {
	error: '',
	keyword: '',
	isViewingResult: false,
	isSearching: false,
	result: {
	  items: [],
	  prevPageToken: null,
	  nextPageToken: null,
	  pageInfo: {
	    resultsPerPage: 0,
	    totalResults: 0
	  }
	}
  }
  ...
}
And as we continue to have other components, there will be more root keys here than just search. Line 32-35 is our search reducer, in Redux a reducer is just a function that takes a state and an action and returns a new state. Its important that reducers never mutate the state inplace, instead it should replace the keys that it needs to be changed. So if you look at all the cases, we never murate state directly but instead use Object.assign which creates new object having the target fields replaced with the updated one. Lets examine the SET_SEARCH_KEYWORD action for example, here we’re copying state to an empty object {} and overriding the field keyword with whatever was passed along with the action. So given our initial state above, if the action was called with the keyword foobar our new state will look like:
{
  search: {
	...
	keyword: 'foobar',
	...
  }
  ...
}
This is where the power of Redux shines, with this we can go back and forth the history of our component’s state which would not have been possible have we modified the state directly. If you’re familiar with EventSourcing this is a similar pattern where you aggregate a collection of events (actions) to produce the final state.
With actions and reducers in place, lets create our Search component at apps/components/search.js:
'use strict'

import React, {
  View,
  Text,
  TextInput,
  Image,
  StyleSheet,
  ActivityIndicatorIOS,
  TouchableOpacity
} from 'react-native'
import { runSearch } from '../actions'

class Search extends React.Component {
  handleKeywordChange(event) {
    this.props.setSearchKeyword(event.nativeEvent.text.trim())
  }

  handleSubmit(event) {
    this.props.runSearch(this.props.keyword)
  }

  handleEnjoy() {
    this.props.listPlaylist(null, true)
  }

  render() {
    return (
      <View style={styles.container}>
        <Image
          style={styles.logo}
          source={require('../images/youtube-logo.png')} />
        {this.props.isSearching ?
          <ActivityIndicatorIOS
            style={styles.preloader}
            animating={this.props.isSearching}
            color="#111"
            size="large"/> :
          <TextInput
            style={styles.searchInput}
            value={this.props.keyword}
            onChange={this.handleKeywordChange.bind(this)}
            onSubmitEditing={this.handleSubmit.bind(this)}
            placeholder="Search for videos" />
        }
        {this.props.error ? <Text style={styles.error}>{this.props.error}</Text> : null}
        <Text style={styles.info}><Text style={{fontWeight: 'bold'}}>extPlaylist</Text> lets you search for youtube videos and create playlist outside of youtube in 3 easy steps:</Text>
        <Text style={styles.step}>1. Search for videos</Text>
        <Text style={styles.step}>2. Add to existing or new playlist</Text>
        <Text style={styles.step}>3. Enjoy your playlist!</Text>
      </View>
    )
  }
}

Search.propTypes = {
  error: React.PropTypes.string.isRequired,
  keyword: React.PropTypes.string.isRequired,
  isSearching: React.PropTypes.bool.isRequired,
  setSearchKeyword: React.PropTypes.func.isRequired,
  runSearch: React.PropTypes.func.isRequired,
}

var styles = StyleSheet.create({
  container: {
    flex: 1,
    flexDirection: 'column',
    backgroundColor: '#F1F1F1',
    paddingTop: 100,
    paddingLeft: 20,
    paddingRight: 20,
    paddingBottom: 20
  },
  logo: {
    width: 250,
    height: 150,
    alignSelf: 'center'
  },
  searchInput: {
    height: 60,
    padding: 10,
    backgroundColor: '#ffffff',
    borderWidth: 1,
    borderColor: '#cccccc',
    borderRadius: 8,
    marginBottom: 20
  },
  info: {
    marginBottom: 10
  },
  step: {
    marginBottom: 5
  },
  preloader: {
    marginBottom: 20
  },
  error: {
    fontSize: 15,
    color: 'red',
    marginBottom: 20,
    alignSelf: 'center'
  }
})

module.exports = Search
Remember back in App component where we passed certain props to Search component? You can see them being used here now. Look at handleKeywordChange, that’s the setSearchKeyword action being called. Our Search component is pretty simple, it has Youtube logo, then conditinal display of preloader if search is ongoing otherwise a text field is displayed. On line 42 we also listen for each keypress invoking the handleKeywordChange method everytime so each keys gets set on our root state. On line 56 also notice how we imposed the strict requirement of passing the props, so you can’t use the component without passing all of those required.
By now we should be able to build our app and you should see something like this:
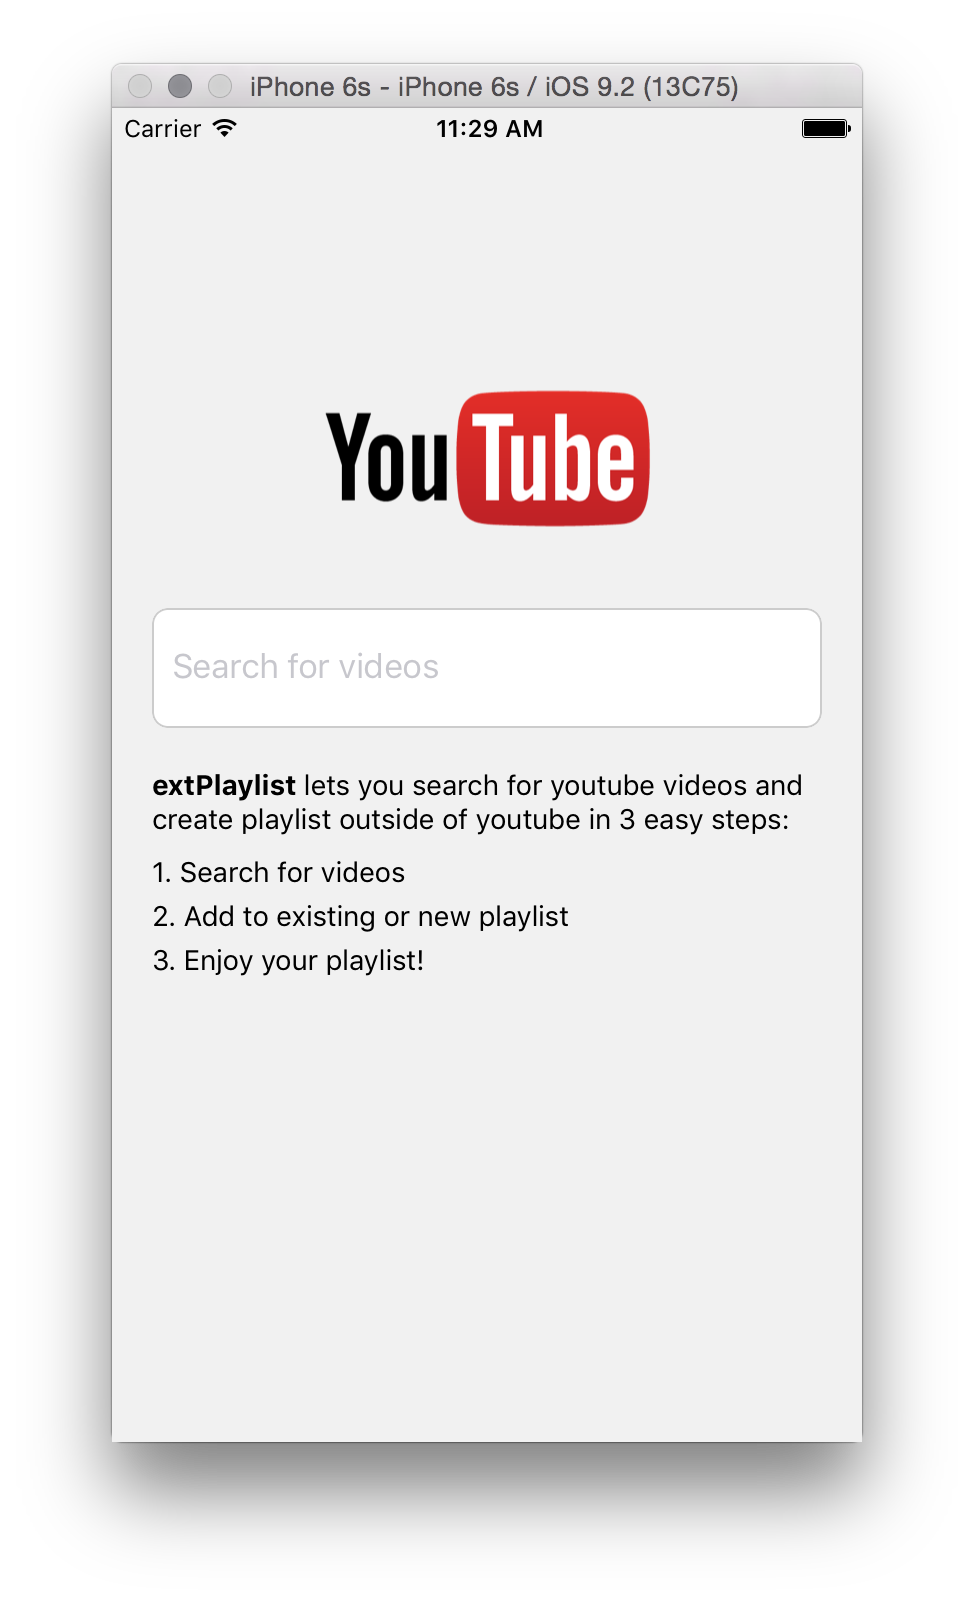
And if you try entering a keyword and press enter, you should see the preloader displayed while the search is being made and disappear when search is done. At this stage it should feel like nothing happened, but if you turn on chrome debugger by pressing ⌘+D while on the simulator, a sub-menu will appear and select Enable Chrome Debugging. A new tab should open up on your Chrome browser, now go to that tab and press ⌘+⌥+I to open up inspector and click Console tab.
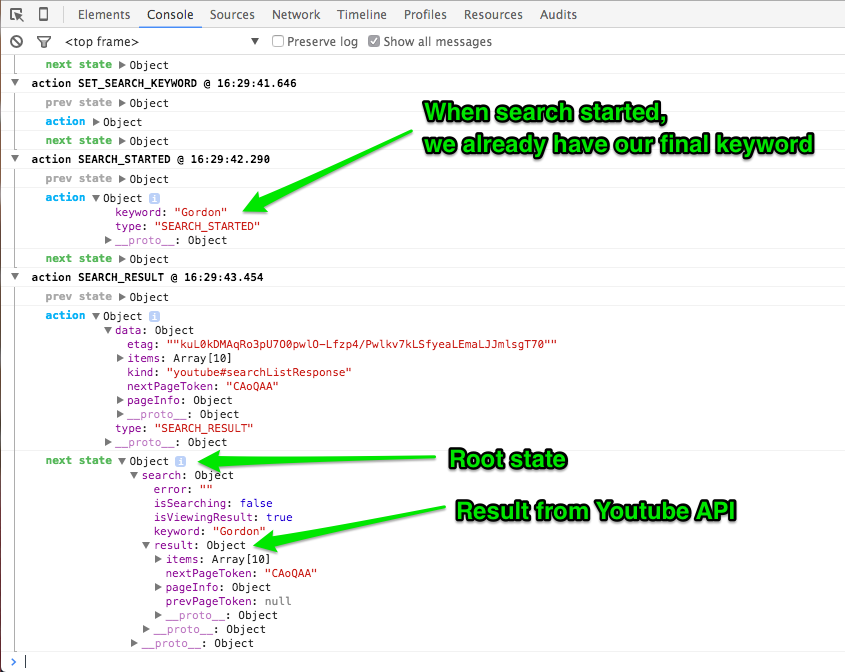
You should see a series of SET_SEARCH_KEYWORD actions being logged (one for each keypress) and then at the bottom one SEARCH_STARTED followed by SEARCH_RESULT.
So what’s missing now is our SearchResult component to display all that results and be able to page through them. Here’s our app/components/search_result.js:
'use strict'

import React, {
  Text,
  View,
  TouchableHighlight,
  TouchableOpacity,
  ListView,
  Image,
  StyleSheet,
  ActivityIndicatorIOS
} from 'react-native'

class SearchResult extends React.Component {
  constructor(props) {
    super(props);
    this.ds = new ListView.DataSource({rowHasChanged: (row1, row2) => row1 !== row2})
    this.state = {
      dataSource: this.ds.cloneWithRows(this.props.result.items),
    }
  }

  componentWillReceiveProps(nextProps) {
    this.setState({
      dataSource: this.ds.cloneWithRows(nextProps.result.items)
    })
  }

  renderRow(rowData) {
    return (
      <View style={styles.row}>
        <TouchableOpacity
          style={styles.rowButton}
          activeOpacity={(this.props.isViewingVideo) ? 1 : 0.2}>
          <View style={styles.rowWrapper}>
            <Image
              style={styles.thumbnail}
              source={{uri: rowData.snippet.thumbnails.default.url}} />
            <Text style={styles.title}>{rowData.snippet.title}</Text>
          </View>
        </TouchableOpacity>
      </View>
    )
  }

  handleMore() {
    this.props.moreVideos(this.props.keyword, this.props.result.nextPageToken)
  }

  render() {
    let footer = null
    const isLoading = this.props.isSearching || this.props.isViewingVideo
    if (isLoading) {
      footer = (
        <View style={styles.footer}>
          <ActivityIndicatorIOS
            animating={isLoading}
            color="#ffffff"
            size="small"/>
        </View>
      )
    } else {
      footer = (
        <TouchableHighlight
          style={styles.footer}
          underlayColor="#991111"
          onPress={this.handleMore.bind(this)}>
          <Text style={styles.moreButtonText}>Show more</Text>
        </TouchableHighlight>
      )
    }

    return (
      <View style={styles.container}>
        <ListView
          style={styles.items}
          dataSource={this.state.dataSource}
          renderRow={this.renderRow.bind(this)} />
        {this.props.result.nextPageToken ? footer : null}
      </View>
    )
  }
}

const styles = StyleSheet.create({
  container: {
    flex: 1,
  },
  items: {
    flex: 1,
    backgroundColor: '#F1F1F1',
    padding: 10,
  },
  footer: {
    padding: 15,
    flexDirection: 'row',
    backgroundColor: '#E62117',
    alignSelf: 'stretch',
    justifyContent: 'center',
  },
  moreButtonText: {
    color: '#ffffff',
    fontSize: 16,
    fontWeight: 'bold'
  },
  row: {
    backgroundColor: '#ffffff',
    borderBottomWidth: 1,
    borderBottomColor: '#cccccc',
    marginBottom: 10
  },
  rowWrapper: {
    flex: 1,
    flexDirection: 'row',
    justifyContent: 'center',
  },
  rowButton: {
    padding: 10,
  },
  title: {
    flex: 1,
    marginLeft: 10,
    color: '#4078C0',
    fontWeight: 'bold'
  },
  thumbnail: {
    width: 120,
    height: 90
  }
})

module.exports = SearchResult
On line 17 we create a DataSource and assign it to this.ds, the ListView component needs it to be able to render rows of items. rowHasChanged is pretty basic rows checking for comparison if one of the rows has changed or not. On line 19 we add a dataSource state by cloning the previous ds we just created, passing in whatever result we got from Youtube. And on line 23, everytime we received new props, we make sure the result gets used as the new dataSource.
On line 29, we have a renderRow function which gets called everytime one of the DataSource item gets rendered. It gets passed the item for that row which we then use to render TouchableOpacity button so we can potentially handle click for each row but we’re not going to do that here but feel free to extend the code. Line 46, handleMore is the handler for paging the results, each new batch of results gets appended at the bottom everytime you click the Show more button. Finally on line 75 we display the ListView passing in the dataSource and renderRow functions.
Before we run this, we need a way to tell the App component to render SearchResult component once search finishes. So lets update our apps/app.js file, first we need to import the SearchResult component:
import SearchResult from './components/search_result'
Then to make the transition between Search to SearchResult, we’re going to use the Navigator component. Lets change our render function to:
  render() {
    return (
      <View style={styles.container}>
        {this.props.search.isViewingResult ?
          <Navigator
            ref="navigator"
            configureScene={(route) => Navigator.SceneConfigs.FloatFromLeft}
            initialRoute={{
              id: 'result',
              title: `'${this.props.search.keyword}'`,
              index: 0
            }}
            renderScene={this.renderScene.bind(this)}
            navigationBar={
              <Navigator.NavigationBar
                style={styles.navBar}
                routeMapper={NavigationBarRouteMapper} />
            }
            newSearch={this.props.newSearch} />
          :
          <Search
            error={this.props.search.error}
            keyword={this.props.search.keyword}
            isSearching={this.props.search.isSearching}
            setSearchKeyword={this.props.setSearchKeyword}
            runSearch={this.props.runSearch} />
        }
      </View>
    )
  }
On line 4, this is where we conditionally check wether ti display the Navigator or the Search component. The Navigator requires a renderScene which is a function that returns which component to render next. Also a navigationBar which is displayed at the top, the NavigationBar requires a routeMapper which we can define like:
const NavigationBarRouteMapper = {
LeftButton(route, navigator, index, navState) {
if (index === 0) {
return (
<TouchableOpacity
onPress={navigator.props.newSearch}
style={styles.navBarLeftButton}>
<Text style={[styles.navBarText, styles.navBarButtonText]}>
« Search
</Text>
</TouchableOpacity>
)
}
const previousRoute = navState.routeStack[index - 1]
return (
<TouchableOpacity
onPress={() => navigator.pop()}
style={styles.navBarLeftButton}>
<Text style={[styles.navBarText, styles.navBarButtonText]}>
« {(index === 1) ? 'Result' : 'Back'}
</Text>
</TouchableOpacity>
)
},
RightButton(route, navigator, index, navState) {
return null
},
Title(route, navigator, index, navState) {
return (
<Text style={[styles.navBarText, styles.navBarTitleText]}>
{route.title}
</Text>
)
}
}
Its just a basic object with 3 methods in it, LeftButton for displaying left button, RightButton for right and Title for the text at the center. Now lets add our App’s renderScene method:
  renderScene(route, navigator) {
    switch (route.id) {
      case 'result':
        return (
          <View style={styles.scene}>
            <SearchResult
              isSearching={this.props.search.isSearching}
              keyword={this.props.search.keyword}
              result={this.props.search.result}
              moreVideos={this.props.moreVideos} />
          </View>
        )
    }
  }
We just check which route id is being requested and return components accordingly. In this case we only have the result route for SearchResult component. Our final apps/app.js file should look like:
'use strict'
import React, {
View,
Text,
Navigator,
StyleSheet,
TouchableOpacity,
} from 'react-native'
import { bindActionCreators } from 'redux'
import { connect } from 'react-redux/native'
import {
setSearchKeyword,
runSearch,
moreVideos,
newSearch,
} from './actions'
import Search from './components/search'
import SearchResult from './components/search_result'
const NavigationBarRouteMapper = {
LeftButton(route, navigator, index, navState) {
if (index === 0) {
return (
<TouchableOpacity
onPress={navigator.props.newSearch}
style={styles.navBarLeftButton}>
<Text style={[styles.navBarText, styles.navBarButtonText]}>
« Search
</Text>
</TouchableOpacity>
)
}
const previousRoute = navState.routeStack[index - 1]
return (
<TouchableOpacity
onPress={() => navigator.pop()}
style={styles.navBarLeftButton}>
<Text style={[styles.navBarText, styles.navBarButtonText]}>
« {(index === 1) ? 'Result' : 'Back'}
</Text>
</TouchableOpacity>
)
},
RightButton(route, navigator, index, navState) {
return null
},
Title(route, navigator, index, navState) {
return (
<Text style={[styles.navBarText, styles.navBarTitleText]}>
{route.title}
</Text>
)
}
}
class App extends React.Component {
renderScene(route, navigator) {
switch (route.id) {
case 'result':
return (
<View style={styles.scene}>
<SearchResult
isSearching={this.props.search.isSearching}
keyword={this.props.search.keyword}
result={this.props.search.result}
moreVideos={this.props.moreVideos} />
</View>
)
}
}
render() {
return (
<View style={styles.container}>
{this.props.search.isViewingResult ?
<Navigator
ref="navigator"
configureScene={(route) => Navigator.SceneConfigs.FloatFromLeft}
initialRoute={{
id: 'result',
title: `'${this.props.search.keyword}'`,
index: 0
}}
renderScene={this.renderScene.bind(this)}
navigationBar={
<Navigator.NavigationBar
style={styles.navBar}
routeMapper={NavigationBarRouteMapper} />
}
newSearch={this.props.newSearch} />
:
<Search
error={this.props.search.error}
keyword={this.props.search.keyword}
isSearching={this.props.search.isSearching}
setSearchKeyword={this.props.setSearchKeyword}
runSearch={this.props.runSearch} />
}
</View>
)
}
}
const stateToProps = (state) => {
return {
search: state.search
}
}
const dispatchToProps = (dispatch) => {
return bindActionCreators({
setSearchKeyword,
runSearch,
moreVideos,
newSearch,
}, dispatch)
}
const styles = StyleSheet.create({
container: {
flex: 1,
justifyContent: 'center'
},
navBar: {
backgroundColor: 'white',
},
navBarText: {
fontSize: 16,
marginVertical: 10,
},
navBarTitleText: {
fontWeight: '500',
marginVertical: 9,
},
navBarLeftButton: {
paddingLeft: 10,
},
navBarRightButton: {
paddingRight: 10,
},
scene: {
flex: 1,
paddingTop: 63,
}
})
export default connect(stateToProps, dispatchToProps)(App)
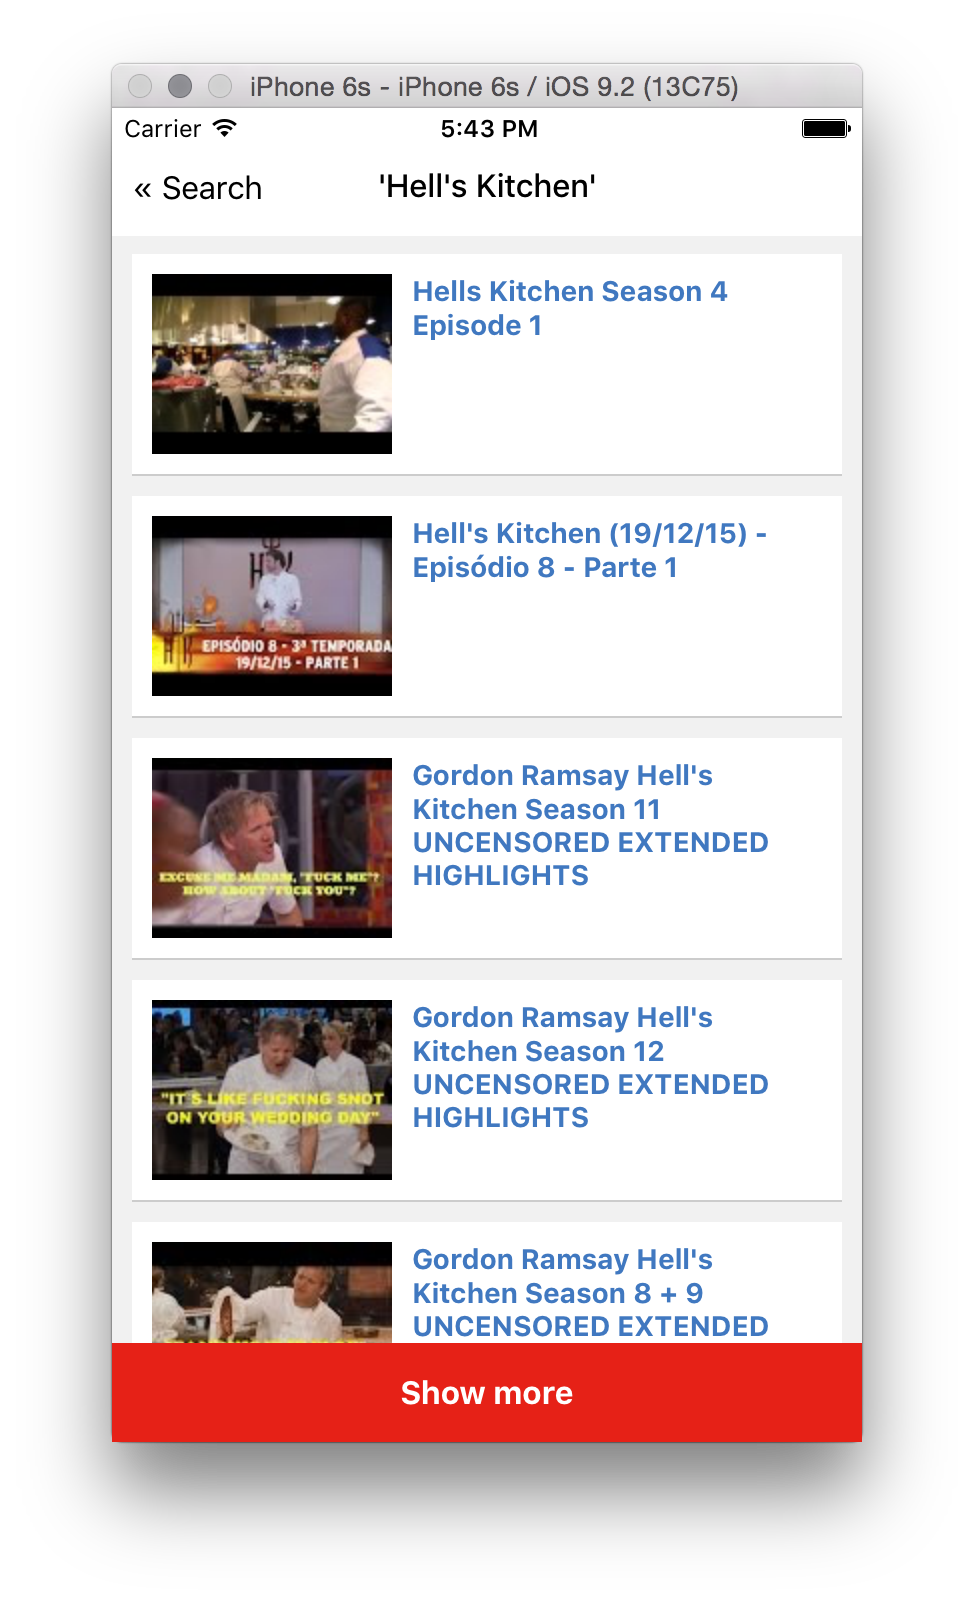
If you run this and try searching, you should now see the list of results we got from Youtube. If you hit Show more the button displays a preloader and when its done more results gets appended below. You can also click Search on upper left of navigation bar which lets you search using new keywords.
And that’s pretty much it, as always you can checkout the final source code here. The nice thing about this is that you can also use Redux and apply what you learned here on your React webapps!